Studio B – Instructions & Troubleshooting Guide

Welcome to Studio B! Please take a moment to read through these instructions to ensure a smooth and productive session. If you change any settings or patching, please return everything to its default configuration before you leave.

1. Software and Interface Setup

UAD Software: This studio uses a UAD Apollo X8 Interface. Please ensure the latest UAD software is installed on your computer. You can find the software here: UAD Connect App

In UA Connect, navigate to the Apollo & UAD-2 tab, then click the Download buttons to initiate the downloads of the UAD Software and UAD Console applications.

After the download is complete, the installer will guide you through the process. Be sure to restart the computer when prompted.

Firmware Update: When you connect the UAD Apollo to your computer, a pop-up may appear asking you to load the firmware. It is essential that you select “Load” and follow the on-screen instructions. This process takes less than a minute. Failing to do so will prevent the interface from being recognized.

  • Note for UAD Users: This may happen even if you own a UAD interface. Loading the studio’s firmware will not alter your personal UAD setup. The only thing that might happen is that you are asked to load your own firmware again when you return to your home setup.

UAD Console Inputs: If you have previously used a different UAD interface, the console will automatically load your last-used settings. This means you may need to manually configure the studio’s console inputs to the default setup:

  • Channel 1: Line In
  • Channel 2: Mic In
  • Channel 3: Mic In 
  • Channel 4: Mic In
  • Channel 5: Line in -10dBV
  • Channel 6: Line in -10dBV
  • Channel 7: Line in -10dBV
  • Channel 8: Line in -10dBV


    UAD Troubleshooting Guide

2. Default Patchbay Setup

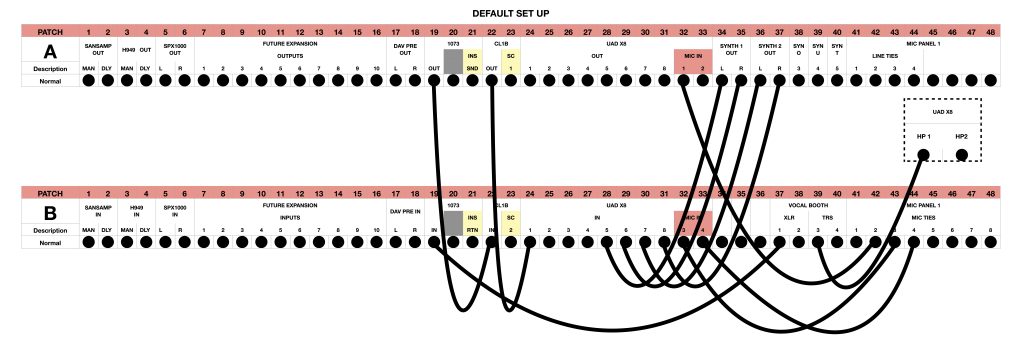
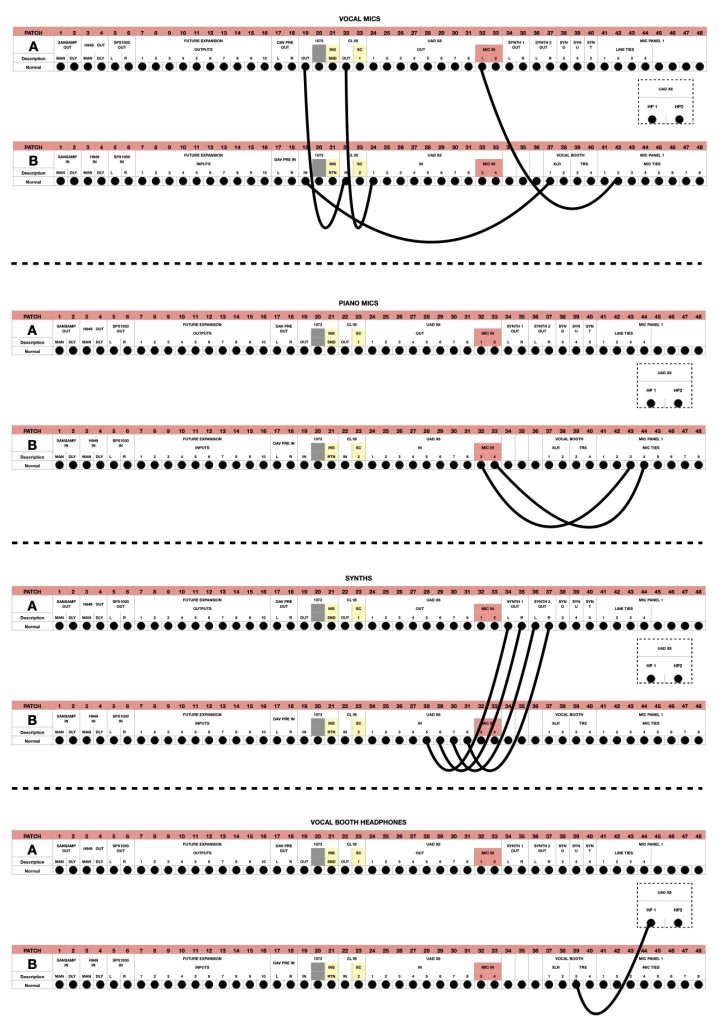
By default, the patchbay is set so that vocals, piano mics, and all synths are patched into the UAD inputs. If you change the configuration, please restore it before you finish your session.

Mic Tie Defaults:

  • Neumann U87 → Vocal Booth XLR 1
  • Shure SM7B → Mic Line Tie 2
  • AKG C214 Pair → Mic Line Tie 3 & 4 (piano, player’s perspective)

Signal Chain (Default Routing):
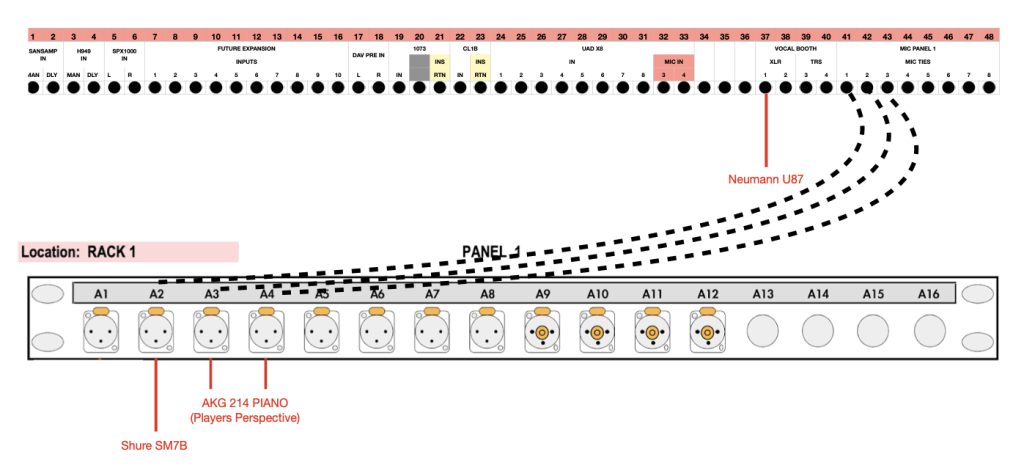
  • U87 → Neve 1073 Preamp (+48V) → Tube Tech CL1B → UAD Line In 1
  • SM7B → UAD Mic Pre 2
  • Piano (C214s) → UAD Mic Pre 3 & 4 (+48V)
  • Synth Stereo 1 → UAD Line In 5 & 6
  • Synth Mono 3 & 4 → UAD Line In 7 & 8 

Mic Ties: 

By default the Neumann U87 is plugged into “Vocal Booth XLR” 1, the Shure SM7B and AKG C214 pair (players perspective) are plugged into “Mic Line Tie” 2, 3 and 4 respectively. If this changes, make sure the mic tie is put back to default. See Diagram below.

The chain:

  • Vocal microphone [U87] – Neve 1073 Preamp (phantom power on*) – Tube Tech CL1B – Input 1 (Line in) on the UAD Interface
  • Vocal microphone [SM7B] – UAD Mic Pre 2
  • Piano [C214] – UAD Mic Pre 3 & 4 (phantom power on*) 
  • Synth Stereo 1-Input 5 & 6 on the UAD Interface
  • Synth Mono 3 & 4 – Input 7 & 8 on the UAD Interface

Breakdown

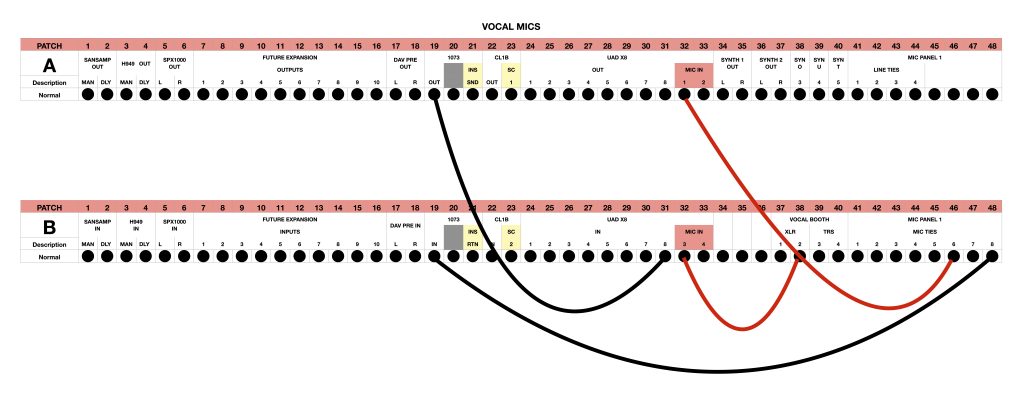
Vocal Microphone [ensure phantom power is on if using a condenser mic]:

3. Connecting a new mic

Plug the XLR from the mic into one of the mic ties in the rack 

Then using the patch bay, connect the corresponding mic tie into either:

  • An external preamp – then connect the output of the preamp into the line input of the UAD [shown below in black]
  • Or directly into one of the internal mic preamps on the UAD interface [shown below in red]

After the session, please ensure everything is returned to its original place.

4. Troubleshooting Common Issues

Before diving into troubleshooting, check the basics:

No sound?

  • Confirm volume is turned up.
  • Make sure mute is disengaged.
  • Ensure monitors/speakers are powered on.
  • Verify your laptop recognizes the Apollo interface.
  • Confirm the Apollo is selected as the active output device.

Mic not coming through?

  • Confirm the channel input is set to the right input level (Line/Mic). 
    • For the U87 (Ch.1) the interface should be on “Line in”.
    • For the SM7B (Ch.2) It should be on “Mic”
    • For the Piano’s C214’s (Ch.3&4) It should be on “Mic”
  • If using a condenser mic, make sure Phantom Power (+48V) is ON.
    • U87: +48V must be engaged on the Neve 1073 Preamp.
    • C214s: +48V must be engaged on the Apollo interface.

Common Issues

ISSUE: No signal in/out of the interface

Probable Cause: Firmware mismatch

Fix: 

  • Open UAD Console → move monitor level. If console and hardware don’t match, firmware isn’t synced.
  • Disconnect/reconnect the USB cable.
  • When prompted, select Load Firmware.
  • After update, power-cycle the Apollo (off → wait 5 sec → on).


ISSUE: Audio is showing on interface meters but no sound from monitors.

Probable Cause: Wrong monitor controller settings

Fix:

  • Ensure Monitor LED lights are on.
  • Confirm monitor controller is unmuted.
  • Input source should be set to 1.


ISSUE: Microphone(s) not coming in.

Probable Causes & Fixes: 

Cause A: Wrong input type

  • Input 1: Line In (U87 → Neve 1073 → Tube Tech → Interface, +48V on at Neve).
  • Input 2: Mic In (SM7B direct to Apollo Mic Pre 2). 
  • Inputs 3 & 4: Mic In (C214s direct to Apollo Mic Pres, +48V on, may be linked).

Cause B: Wrong patchbay connection

  • Patchbay may have been altered.
  • ⚠️ Do not remove all the patch cables when trying to reset defaults.
  • Refer to the Default Patchbay Setup section to confirm correct routing.

Cause C: Firmware mismatch

  • If inputs still don’t register, check whether the Apollo firmware is synced.
  • See ISSUE: No signal in/out of the interface for firmware update steps.


*type at least 1 character to search
TAKE ME TO THE TOP Read View